[Android]Fragment取代TabActivity實作Tab分頁標籤
各位Android安卓開發者大家好!^^
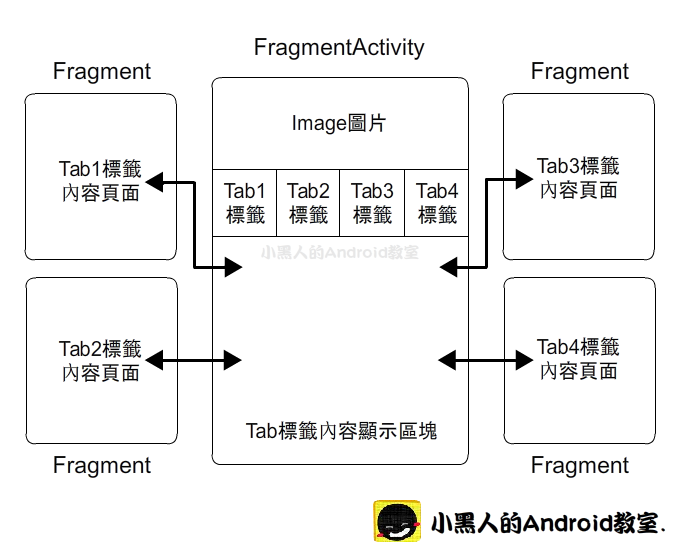
1. 首先小黑人先用簡單的架構圖來說明這次範例實作的結構 :
以上根據架構圖的結構,小黑人會運用Fragment加入4個Tab分頁標籤來實作這次的範例。
2. 因為AndroidManifest.xml不需要做特別的編輯設定,所以我們先針對Layout(.xml)來進行頁面框架的撰寫 :
a. main.xml :
<android.support.v4.app.FragmentTabHost
xmlns:android="http://schemas.android.com/apk/res/android"
android:id="@android:id/tabhost"
android:layout_width="match_parent"
android:layout_height="match_parent"
>
<LinearLayout
android:orientation="vertical"
android:layout_width="match_parent"
android:layout_height="match_parent"
>
<!-- Image圖片 -->
<ImageView
android:layout_width="match_parent"
android:layout_height="wrap_content"
android:background="@drawable/title_img"
/>
<!-- Tab標籤 -->
<TabWidget
android:id="@android:id/tabs"
android:orientation="horizontal"
android:layout_width="match_parent"
android:layout_height="wrap_content"
/>
<FrameLayout
android:id="@android:id/tabcontent"
android:layout_width="match_parent"
android:layout_height="wrap_content"
android:visibility="gone"
/>
<!-- 標籤內容顯示區塊 -->
<FrameLayout
android:id="@+id/container"
android:layout_width="match_parent"
android:layout_height="match_parent"
android:layout_weight="1"
/>
</LinearLayout>
</android.support.v4.app.FragmentTabHost>
b. fragment_layout.xml :
<RelativeLayout
xmlns:android="http://schemas.android.com/apk/res/android"
android:layout_width="match_parent"
android:layout_height="match_parent"
android:paddingTop="35dip"
>
<!-- 標籤切換的內容圖片 -->
<ImageView
android:id="@+id/img"
android:layout_width="wrap_content"
android:layout_height="wrap_content"
android:layout_centerInParent="true"
/>
<!-- 標籤切換的內容文字 -->
<TextView
android:id="@+id/text"
android:layout_width="match_parent"
android:layout_height="wrap_content"
android:gravity="center_horizontal"
android:textColor="@android:color/white"
android:textSize="23sp"
android:lineSpacingExtra="20dip"
/>
</RelativeLayout>
3. 接下來要開始撰寫Activity框架與Fragment分頁的部分(.java) :
(總共有5個class,包含MainActivity與4個分頁Fragment)
a. MainActivity :
//Activity繼承的是FragmentActivity,而不是舊版本的TabActivity
public class MainActivity extends FragmentActivity
{
@Override
protected void onCreate(Bundle savedInstanceState)
{
super.onCreate(savedInstanceState);
setContentView(R.layout.main);
//獲取TabHost控制元件
FragmentTabHost mTabHost = (FragmentTabHost) findViewById(android.R.id.tabhost);
//設定Tab頁面的顯示區域,帶入Context、FragmentManager、Container ID
mTabHost.setup(this, getSupportFragmentManager(), R.id.container);
/**
新增Tab結構說明 :
首先帶入Tab分頁標籤的Tag資訊並可設定Tab標籤上顯示的文字與圖片,
再來帶入Tab頁面要顯示連結的Fragment Class,最後可帶入Bundle資訊。
**/
//小黑人建立一個Tab,這個Tab的Tag設定為one,
//並設定Tab上顯示的文字為第一堂課與icon圖片,Tab連結切換至
//LessonOneFragment class,無夾帶Bundle資訊。
mTabHost.addTab(mTabHost.newTabSpec("one")
.setIndicator("第一堂課",getResources().getDrawable(R.drawable.lesson1_item))
,LessonOneFragment.class,null);
//同上方Tab設定,不同處為帶入參數的差異
mTabHost.addTab(mTabHost.newTabSpec("two")
.setIndicator("第二堂課",getResources().getDrawable(R.drawable.lesson2_item))
,LessonTwoFragment.class,null);
//同上方Tab設定,不同處為帶入參數的差異
mTabHost.addTab(mTabHost.newTabSpec("three")
.setIndicator("第三堂課",getResources().getDrawable(R.drawable.lesson3_item))
,LessonThreeFragment.class, null);
//同上方Tab設定,不同處為帶入參數的差異
mTabHost.addTab(mTabHost.newTabSpec("four")
.setIndicator("第四堂課",getResources().getDrawable(R.drawable.lesson4_item))
,LessonFourFragment.class,null);
}
/**
方法權限設定為Public目的是可以讓Fragment取得內容 。
*/
//Tab - Lesson One的文字內容
public String getLessonOneText()
{
return "小黑人的Android教室\n- 第一堂課 -";
}
//Tab - Lesson Two的文字內容
public String getLessonTwoText()
{
return "小黑人的Android教室\n- 第二堂課 -";
}
//Tab - Lesson Three的文字內容
public String getLessonThreeText()
{
return "小黑人的Android教室\n- 第三堂課 -";
}
//Tab - Lesson Four的文字內容
public String getLessonFourText()
{
return "小黑人的Android教室\n- 第四堂課 -";
}
}
b. 第一個Tab分頁 - LessonOneFragment
//Tab分頁class繼承Fragment
public class LessonOneFragment extends Fragment
{
//顯示文字內容
private String text = "";
@Override
public void onAttach(Activity activity)
{
super.onAttach(activity);
//取得MainActivity的方法,將文字放入text字串
MainActivity mMainActivity = (MainActivity) activity;
text = mMainActivity.getLessonOneText();
}
@Override
public View onCreateView(LayoutInflater inflater, ViewGroup container, Bundle savedInstanceState)
{
//導入Tab分頁的Fragment Layout
return inflater.inflate(R.layout.fragment_layout, container, false);
}
@Override
public void onActivityCreated(Bundle savedInstanceState)
{
super.onActivityCreated(savedInstanceState);
//取得TextView元件並帶入text字串
TextView mText = (TextView) getView().findViewById(R.id.text);
mText.setText(text);
//取得ImageView元件並帶入指定圖片
ImageView mImg = (ImageView) getActivity().findViewById(R.id.img);
mImg.setImageResource(R.drawable.lesson1_img);
}
}
c. 第二個Tab分頁 - LessonTwoFragment
//Tab分頁class繼承Fragment
public class LessonTwoFragment extends Fragment
{
//顯示文字內容
private String text = "";
@Override
public void onAttach(Activity activity)
{
super.onAttach(activity);
//取得MainActivity的方法,將文字放入text字串
MainActivity mMainActivity = (MainActivity) activity;
text = mMainActivity.getLessonTwoText();
}
@Override
public View onCreateView(LayoutInflater inflater, ViewGroup container, Bundle savedInstanceState)
{
//導入Tab分頁的Fragment Layout
return inflater.inflate(R.layout.fragment_layout, container, false);
}
@Override
public void onActivityCreated(Bundle savedInstanceState)
{
super.onActivityCreated(savedInstanceState);
//取得TextView元件並帶入text字串
TextView mText = (TextView) getView().findViewById(R.id.text);
mText.setText(text);
//取得ImageView元件並帶入指定圖片
ImageView mImg = (ImageView) getActivity().findViewById(R.id.img);
mImg.setImageResource(R.drawable.lesson2_img);
}
}
d. 第三個Tab分頁 - LessonThreeFragment
//Tab分頁class繼承Fragment
public class LessonThreeFragment extends Fragment
{
//顯示文字內容
private String text = "";
@Override
public void onAttach(Activity activity)
{
super.onAttach(activity);
//取得MainActivity的方法,將文字放入text字串
MainActivity mMainActivity = (MainActivity) activity;
text = mMainActivity.getLessonThreeText();
}
@Override
public View onCreateView(LayoutInflater inflater, ViewGroup container, Bundle savedInstanceState)
{
//導入Tab分頁的Fragment Layout
return inflater.inflate(R.layout.fragment_layout, container, false);
}
@Override
public void onActivityCreated(Bundle savedInstanceState)
{
super.onActivityCreated(savedInstanceState);
//取得TextView元件並帶入text字串
TextView mText = (TextView) getView().findViewById(R.id.text);
mText.setText(text);
//取得ImageView元件並帶入指定圖片
ImageView mImg = (ImageView) getActivity().findViewById(R.id.img);
mImg.setImageResource(R.drawable.lesson3_img);
}
}
e. 第四個Tab分頁 - LessonFourFragment
//Tab分頁class繼承Fragment
public class LessonFourFragment extends Fragment
{
//顯示文字內容
private String text = "";
@Override
public void onAttach(Activity activity)
{
super.onAttach(activity);
//取得MainActivity的方法,將文字放入text字串
MainActivity mMainActivity = (MainActivity) activity;
text = mMainActivity.getLessonFourText();
}
@Override
public View onCreateView(LayoutInflater inflater, ViewGroup container, Bundle savedInstanceState)
{
//導入Tab分頁的Fragment Layout
return inflater.inflate(R.layout.fragment_layout, container, false);
}
@Override
public void onActivityCreated(Bundle savedInstanceState)
{
super.onActivityCreated(savedInstanceState);
//取得TextView元件並帶入text字串
TextView mText = (TextView) getView().findViewById(R.id.text);
mText.setText(text);
//取得ImageView元件並帶入指定圖片
ImageView mImg = (ImageView) getActivity().findViewById(R.id.img);
mImg.setImageResource(R.drawable.lesson4_img);
}
}
以上5個Class撰寫完成後就可以實踐Tab頁籤的功能,其中範例裡的4個分頁Fragment Class其實版面架構都是一樣的,只是變換不同的顯示文字與圖片,小黑人只是用簡單的方式來表達Tab分頁標籤的效果,但依照不同的開發需求可以變更Fragment的Layout與功能,大家可以試試看使用Fragment來呈現Tab分頁標籤的架構。
From : http://dean-android.blogspot.tw/2015/01/androidfragmenttabactivitytab.html


留言
張貼留言